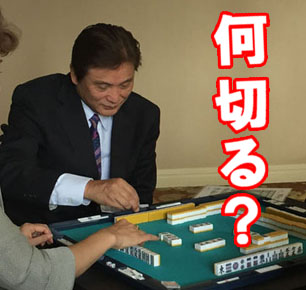
 At the NYC International Riichi Open, we had a chance to sit down with the President of the Japanese Professional Mahjong League (and one of the strongest Mahjong players on the planet), Shigekazu Moriyama, as he gave those attending some insights on example hands in the closing hours of the event, using the standard “Nani kiru?” (what would you discard?) teaching method. We recorded each one so that we could pass this on to those that couldn’t make it to this awesome event. Read on!
(note: if something is not discussed in a hand, such as board state, dora, points, etc. are skipped because for the purposes of that individual example they do not affect the outcome)
Example 1
![]()
![]()
![]()
![]()
![]()
![]()
![]()
![]()
![]()
![]()
![]()
![]()
![]()
![]()
Q: If you were to Reach, what would you discard? the 3m or the 6m?
A:![]() .
.
Why? Because there is a less chance of an uradora with the ![]() , as you already have 2
, as you already have 2 ![]() in your hand.
in your hand.
Example 2
East 1, you are South, with 25000 points (out of a starting 25000).
2nd discard (your first discard was ![]() )
)
Dora: ![]() (indicator is
(indicator is ![]() )
)
![]()
![]()
![]()
![]()
![]()
![]()
![]()
![]()
![]()
![]()
![]()
![]()
![]()
![]()
Q: What would you cut?
A: ![]()
![]() .
.
Why? Your Chitoi with the Reds is a very cheap hand, and is also relatively slow to come together. However, all of your other tanyao tiles can easily grow to also have pinfu, sanshoku, and so on – the “nimbleness” of your hand is great, with all the possible yaku that can still fit in. Even if you need to move quickly, multiple calls to put together tanyao+sanshoku is more valuable and faster.
Example 3
East 1, you are South, with 25000 points (out of a starting 25000).
during 3rd discard
dora: ![]() (indicator is
(indicator is ![]() )
)
![]()
![]()
![]()
![]()
![]()
![]()
![]()
![]()
![]()
![]()
![]()
![]()
![]()
Q: Do you Reach?
A: No!
Reach alone is cheap and locks you down. Even if someone deals in and you get an uradora, that’s only 2600 points. In this situation, if you drew your win, you wouldn’t even call a win. There are so many tiles you can draw that turns this into pinfu, tanyao, or both, that waiting for one is a good idea. 2s,4s,2m, 5m, 4p,6p all give you pinfu and almost always tanyao, and tons more give you just tanyao (7p for example). Reach alone is a dangerous choice to make – it is a cheap hand with no bailing ability. Generally, you don’t want to Reach unless you have at least one yaku already in-hand.
Example 4
Early in the hand, no dora
![]()
![]()
![]()
![]()
![]()
![]()
![]()
![]()
![]()
![]()
![]()
![]()
![]()
![]()
Q: What do you cut to keep going forward, if you are looking for both fast and good hands?
A: ![]() .
.
The possibility of drawing a ![]() and having a
and having a ![]()
![]()
![]() ruins the power of the hand, and you don’t want to give up the chance at chitoi just yet (which is why you keep the
ruins the power of the hand, and you don’t want to give up the chance at chitoi just yet (which is why you keep the ![]() for now). If you draw
for now). If you draw ![]() or
or ![]() , you are down to two-sided or pair-inclusive waits, so tanyao+pinfu and tanyao+sanankou are both available, so stepping away from chitoi towards those possibilities is fine.
, you are down to two-sided or pair-inclusive waits, so tanyao+pinfu and tanyao+sanankou are both available, so stepping away from chitoi towards those possibilities is fine.
Example 5
Dora: ![]() (Indicator is
(Indicator is ![]() )
)
![]()
![]()
![]()
![]()
![]()
![]()
![]()
![]()
![]()
![]()
![]()
![]()
![]()
![]()
Q: what to cut?
Think about the end hand you want. tanpin, sanshoku, dora pair perhaps.
![]()
![]()
![]()
![]()
![]()
![]()
![]()
![]()
![]()
![]()
![]() (
(![]()
![]() /
/ ![]()
![]() /
/ ![]()
![]() )
)
A: ![]() isn’t in any of it, so that is what you discard.
isn’t in any of it, so that is what you discard.
Note the ![]() . It isn’t a “good” (tile efficiency) tile at this point, but if you draw a
. It isn’t a “good” (tile efficiency) tile at this point, but if you draw a ![]() , then it becomes an important tile for calling to a quick tenpai.
, then it becomes an important tile for calling to a quick tenpai.
Example 6
East 1, you are West, no dora
![]()
![]()
![]()
![]()
![]()
![]()
![]()
![]()
![]()
![]()
![]()
![]()
![]()
![]()
This hand is cheap if you finish it as is. How can you make it worth more?
Again, look at the nimbleness of your hand.
Hon itsu, toi toi, san ankou, tan, pin, ii pei kou, san shoku. Any of these are legitimate paths. Think of all possible yaku as a light-up board, showing what your hand still could be.
To go for tan+chitoi, tan+pin/iipeikou, keep ![]()
![]()
![]()
![]()
![]()
![]()
![]()
![]() .
.
Toitoi / san ankou, keep ![]()
![]()
![]()
![]()
![]()
![]()
honitsu, keep ![]()
![]()
![]()
![]()
![]()
![]()
![]()
![]()
![]() , be prepared to call.
, be prepared to call.
All of those hands can currently be worked toward.
What is the one tile that isn’t needed by any of them?
A: ![]()
Lastly, if none of it comes together, and you have to defend, ![]()
![]() are relatively safe discards against an unknown hand.
are relatively safe discards against an unknown hand.
Hope you enjoyed these as much as we did!